
Bike Setup Thoughts - Tyre Pressure.

Schwalbe Magic Mary. My go-to front tyre these days. 21psi.
Why you should care
Tyres are your bike’s first contact point with the ground. Every input that gets transmitted from either the ground or the rider needs to go through your tyres. I am a strong advocate for caring about tyre pressure - for control, safety and confidence.
It’s such a simple variable to control and yet so many miss this easy opportunity to improve their bike’s handling. How many football games on a Sunday do you see with a flat ball? None.
So why ride a bike with over or under inflated tyres - in a much more risky and consequential environment?
Accuracy is key
First things first - use a digital pressure gauge to set your pressures accurately before every ride. We use the Topeak gauges like this one in our MTB coaching in Queenstown.
Tubeless tyre systems do not have a perfect seal and are not truly airtight. Your tyres WILL go down (by varying degrees) between rides - even if its just a day later. I view setting my pressures before I ride as equally important as putting some pants on.
If you want to get even more granular, temperature fluctuations within the same day can change pressures significantly - I recorded changes of 3-4psi between a cooler morning and hot afternoon. Could that be the difference between gripping and sliding? Absolutely.

The difference a tyre can make. I ended up running 36psi in this Schwalbe Albert Radial Gravity.
Pressure factors
So what pressure should I run? It depends, and it takes some effort to find out.
The primary factors are the rider, terrain, and tyre itself. Because these change so widely between riders, it’s impossible to pin a number on what someone ‘should’ be running.
Riders can have different weights, abilities, and styles (light and poppy vs straight line plougher, rearward vs centred weight bias, etc.) which will subject a tyre to varying forces. Terrain can have different speeds, surfaces, gradients and features. Tyres can have a seemingly infinite variety of casings, compounds and tread patterns.
With so many combinations, testing becomes so important - you need to find out what works for you, on the tracks you ride, with your equipment.
The ideal pressure is the one which provides the best balance of support and grip. The goal is to go as low as possible (more grip) without feeling negative effects from less support (e.g. squirming under load, too slow rolling, repeated rim dings).
Find out - Test!
To find a baseline pressure, you’ll need to dedicate some time to follow a process - ‘bracketing’. Once found, this will become your go-to pressure that you know works in most situations.

5 runs and you could narrow down your ideal pressure. Not so bad eh?
Bracketing - Method one
This is what I know as true bracketing. A Vorsprung Tuesday Tune episode introduced this to me (go there for more info). You can use it for any bike adjustment that has a ‘range’ of settings.
Start this process by testing the ‘extremes’ of the usable pressure spectrum. This could look like doing a run at 15psi vs 35psi (for the sake of round numbers). Do another run at the mid point, 25psi. At the end of the run, decide which one you liked least. Lets say it was 35psi. We’ll eliminate that one. Soz 35psi, you are the weakest link. Goodbye.
Now, create a new ‘bracket’ between the settings you did like. Repeat the process - try each end of the bracket (15psi and 25psi), then the middle (20psi). Eliminate the least liked. Go again.
Continue this process of testing smaller brackets until you arrive at a preferred number.
I have suggested one run for one pressure, but just ride for as long as you need to gather your impressions and feedback. The narrower the brackets get, the more time you’ll probably need to spend, and back to back testing is important.
The pro of this process is you get to feel and experience what different pressures do to the handling of the bike. The con, is that it takes time - however, it is undoubtably the most efficient use of time so long as you are purposeful with your testing.
Gradual movements in the preferred direction, until you don’t prefer it.
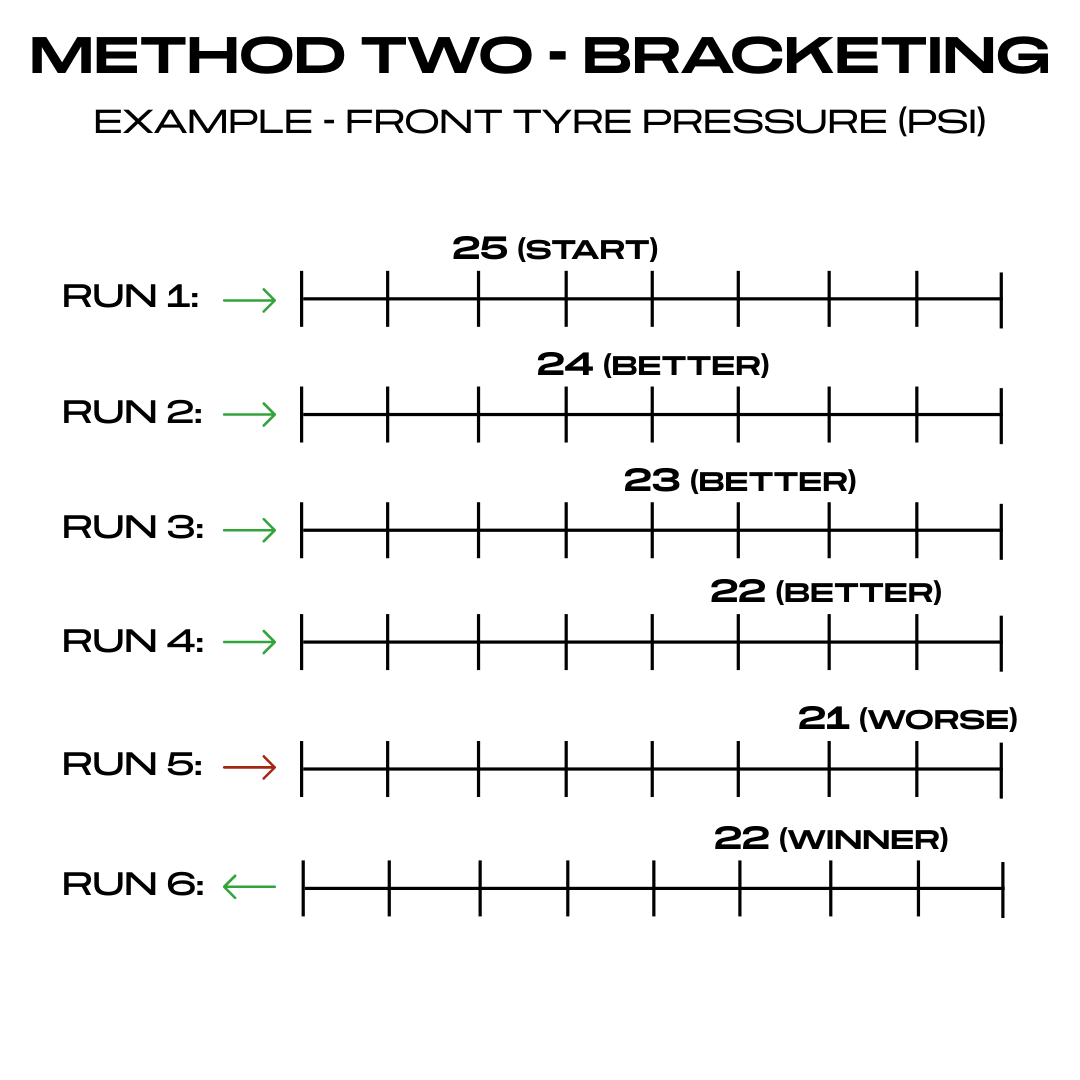
Method two
The second way of doing it is to take a starting point and gradually move in a direction until you don’t like it.
For example, start at 25psi, take 1psi out each run and notice whether its better or worse. If it’s better, keep moving in that direction. Lets say at 21psi you found it was worse. Go back to the last known better setting - 22psi.
This can be quicker, but your experiential learning and sensation development as a rider are more limited.
I like to use it when testing around a known baseline that’s been established with method one, or with riders who have a very good sense of ‘feel’ - you need to confidently know it’s better or worse to make this method work.
Front vs Rear Differential
The front and rear tyres have different demands placed on them. The rear tyre is subject to more force and loading, while the front transmits most of the direction control inputs from the rider.
To account for to these demands, it’s common that the rear tyre is run at slightly higher pressure than the front. This is because we need to bias the pressure towards more support (rear), or more grip (front). Your bracketing will solve this for you.
Some riders can be sensitive to the differential between front and rear. Personally I run quite a big difference (21psi vs 27psi on the Madonna V3). This can change from track to track, different conditions and different bikes. I smell another testing opportunity here…

Continenta Kryptotal R, DH, SS. 26psi. A splendid rear rubber.
When to adjust?
The more conditions that you test in, the more confidence you can have in controlling that variable.
For example, wet conditions will (more than) likely change your pressures, as will different tracks (e.g. big jump lines on hardpack vs. slow enduro tech on roots).
It’s easy to experiment, so long as you know your baseline. This is where ‘Method two’ of testing makes more sense because you have a known preference-reference.
When adjusting pressure, just think - do I want more support (increase), or more grip (decrease)? Now you know which direction to adjust in, you can get started with your experiment.
Write it down after!
Summary
We recognise bikes as a key performance factor for our MTB coaching clients in Queenstown. Tyre pressure is a very simple adjustment that you shouldn’t ignore.
Even if it’s not on a specific testing day doing repeat laps on the same track, make adjustments between rides to at least improve your knowledge.
Take some time to experiment with some different pressures and decide what works best for you. It will pay off enormously in improving your riding experience.
MTB coaching in Queenstown means my gear gets used. A lot. Over the years I have used a huge amount of gear from different brands and have put them through their paces. Some have triumphed, some have been been average, and many have failed. This blog aims to give you an honest insight into the stuff we rate and trust to use in our daily work as mountain bike coaches in Queenstown. While we do get some support from brands, the majority of our gear is purchased through stores, just like any other customer. In the cases where we have pricing privileges, we’ll make it clear. Ultimately, we choose everything we use.
These words belong to me - our blogs are never written with AI.